Here is a step by step for my little Shrimp pattern that I came up with, it takes cues from Bob Popovic's Ultra Shrimp but with some of my own little tweaks. This fly will take fish the world over but is particularly aimed at Sea Trout and Bass but will of course adapt to Bones and any other Shrimp feeding species. I hope you like it !
First you will need to sort some eyes, whether bought commercial ones, or your own home made ones, I can also supply you with custom made one's as featured here to suit any hook size, so if you would like some let me know !
Ok so this is how I make my Shrimp eye's.
Take two pieces of heavy mono and blob the ends with a lighter
Next colour the ends in with a Black permanent marker pen
I use UV resin to form the eyes in the shape of Deer Creek Resin Flex or Fine Flex
So add a little blob of resin to the ends of the mono and rotate the resin around until you achieve the desired shape. In this case I am tying on a size 6 hook so I only need small eyes but if you want to make bigger one's then just keep adding blobs of resin until you have the size you want.
Ok so lets begin by catching some mono thread on to the bend of the hook
For the Mouth parts I simply use a small piece of white Laser dub, no need to make it complicated...
Now tie in a bunch of Silli legs diagonally across the shank at 45 degrees
Then fold them forward to the bend of the hook and tie down and trim the ends to the length you want.
Time to take your mono eyes and tie them in, settle them into place until you are happy with the final position with a few loose wraps
Once you're happy tie them down securely and trim the tag ends of the mono off.
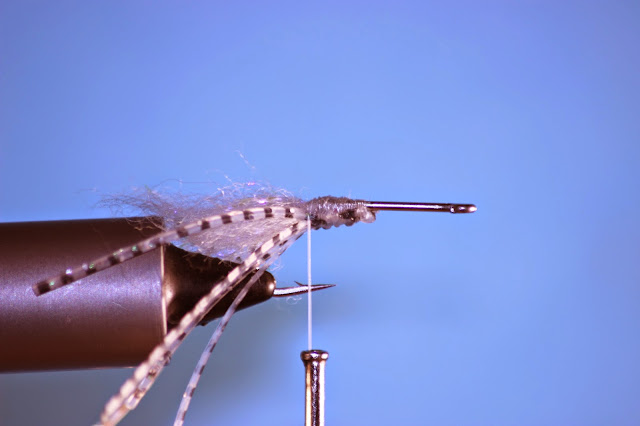
For the Antenna's / Feelers I strip a couple of feathers down to the quill, trim them to size and then tie them in on top of the eyes. You will probably have to manipulate the Antenna until the position is right but they should sit just over the top of the eyes and curve outwards slightly. Shape them by pinching them lightly between your finger and thumb nail and then run along them, this will cause them to curve.
Run your thread down to the eye of the hook now as we are finished tying in the front parts of the Shrimp.
Take some Supreme hair next, I'm using Tan colour here, and tie a thin bunch in on top of the Shrimp, secure it just by the eye of the hook only, leave a bit extending beyond the eye of the hook to form a tail as in the picture, then trim and whip finish...don't worry we're going to finish the rest with UV Resin !
To apply the UV Resin to form the carapace, pinch the supreme hair and pull it down between the eyes, then begin applying your resin along the length of the hair from hook eye to just beyond the eyes of the Shrimp, ( not on the tail ). To make it easier I use two types of resin here, the first coat is done with a thin resin ( Fine Flex ), so that it soaks into the hair properly to get a nice clear bubble free finish. The final coats are done with a thick resin ( Flex ) as it's much simpler to build a body with....
Some tips on using resin : keep rotating the fly in the vice to ensure you don't get any drips, if you do get drips just wick them away with a cocktail stick. Apply the resin in thin coats to try and avoid this.
Keep building up the coats until you have the body shape you want.
Once the body is finished take a permanent marker and put some bars on the Antenna for extra realism.
The finished article !
I hope you enjoy tying this Shrimp and catch plenty of fish on it, please send me the pictures !


No comments:
Post a Comment
Please leave a comment here if you wish to message me. Thanks.